
Grow Light Layout: 5 Things YOU Should Be Doing!
(Want intense plant growth? Better get your lighting layout right. The goal is to create a uniform light intensity across your available area.
If you have an uneven spread of light, plants in bright hot spots grow taller and shadow the plants around them. This restricts growth, resulting a lower yield.
To prevent this, you need to create even light coverage in your tent.
Here’s how you get your lighting layout right. (Update: if you are looking into growing with LED lights - check out this article on LED light layouts and our range of led grow lights here.
1. Pick the Right Number of Lights
If you use the wrong number of lights, one of two things can happen:
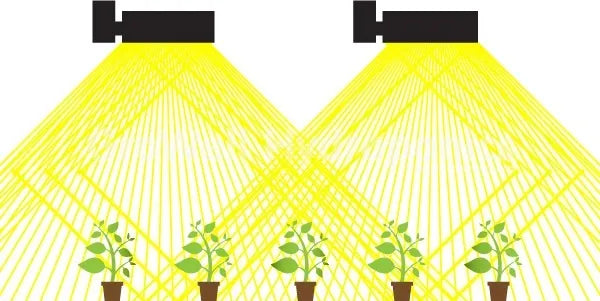
- If you use too many, light footprints will overlap, creating bright, hot spots
- If you use too few, areas in your tent won’t be covered by your lights
Either way, when this happens, plant growth is uneven.
It differs, depending on the shape of the reflector, but as a rule, here’s how much coverage you can get from each light:
- 1 x 250W indoor grow light per 0.75m x 0.75m area
- 1 x 400W indoor grow light per 1m x 1m area
- 1 x 600W indoor grow light per 1.2m x 1.2m area
- 1 x 1000W growing light per 1.5m x 1.5m area
Example 1: in a 1.2m x 1.2m tent, a 600W light is ideal
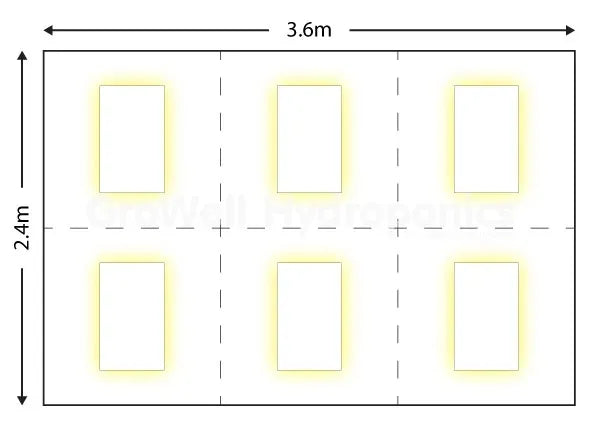
Example 2: In a 1.2 x 2.4m tent, you need 2 x 600W lights
2. Get your reflectors right
Your reflector determines the spread of light you get. You need to pick and position your reflectors well.
So which reflector do you need?
It’s horses for courses. The one you need depends on:
- The shape and size of your tent
- How many lights you have and where you’re going to position them
It’s so important to get right that tents are being built specifically for specific reflectors. Like the Mammoth Gavita G1 & G2 Tents that were made for Gavita's SR reflectors. Then there’s the AW Tents, dreamed up by BudBox and Adjust-A-Wings.
Single light, square area
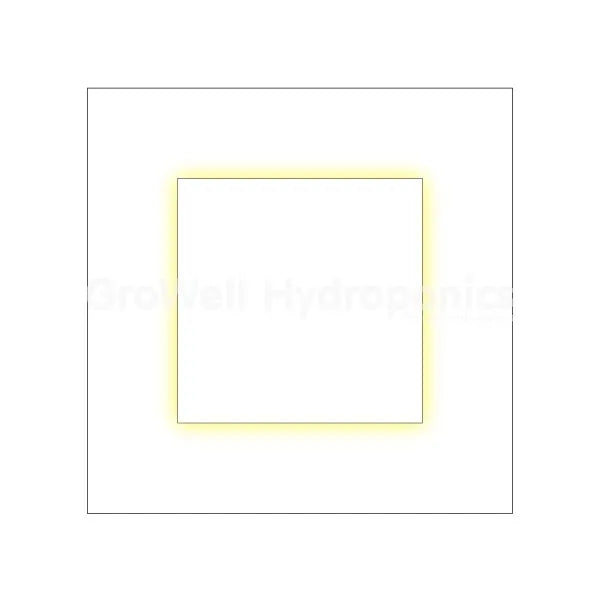
Use a square reflector and position it in the centre of your tent.
The Northstar reflector is perfect in the centre of a 1.2m x 1.2m square tent (e.g. BAY6 XL tent).
Multiple lights, rectangular area
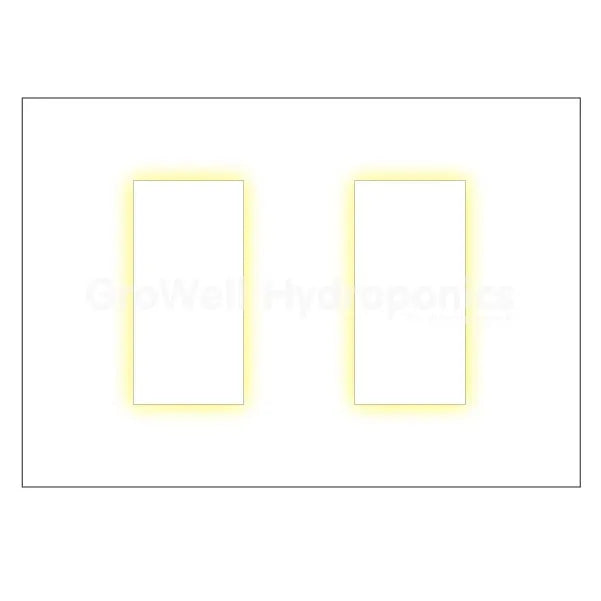
If you have a larger area, you will need to split it into sections, and place the reflector in the centre of each section.
If using 2 lights in an Aw150 tent, the Adjust-A-Wings Avenger reflector is ideal.
Gavita Lights
Gavita lights are the exception to the rule. Gavita have used their 3D modelling software to create a lighting layout that creates a uniform spread of light by using overlapping light reflections from your tent.
With a Gavita lighting layout you’ll get:
- Intense light focussed down towards your plants
- Exceptional crop penetration
- Uniform light levels
If using a Gavita light in another grow tent, you may be better off with an HR96 Reflector, which is the one supplied with Gavita lighting systems. It has a slightly wider beam angle of 138o!
If you’re interested in Gavita lights, visit your local store to get a bespoke layout.
3. Determine your Light Height
The position of your grow lights will determine:
- The overall light intensity
- How much light is lost to walls
- Penetration angles
- Levels of overlapping light
- Light uniformity
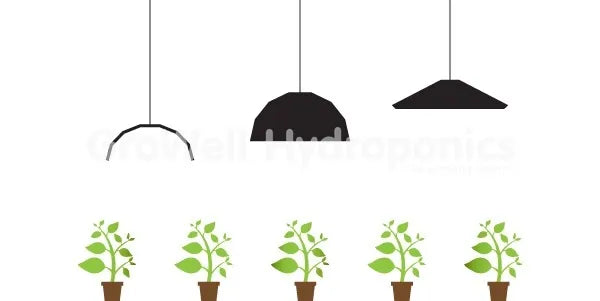
Open end reflectors:
Let a lot of heat escape, so you can bring them closer to your plants.
Closed end reflectors:
Have a more intense focus of light and therefore have a greater heat build-up. You will need to position them farther from your plants.
Air cooled reflectors:
You can bring air cooled reflectors closer to your plants than you can closed end reflectors. However, cold air rushing over the bulb can decrease the burning temperatures of gases inside, resulting in a loss of spectrum.
Whichever reflector you're using, you need to adjust the height of your lighting system as plants grow, to maintain a safe distance between your crop and lamp.
When you first introduce plants to your grow space, if using a 600W light, you need to keep them at least 3 - 4 feet away from your plants to begin with, just while your plants climatise to the heat.
Gavita Lights
Don’t worry about adjusting your height - keep your Gavita lights at a fixed height, at the top of your growing space.
You get an incredibly intense, uniform light that's floods your entire growing area:
You don’t need to build up your intensity; it increases as plants grow towards your lights.
You get none of the problems associated with dimming lights (loss of spectrum & light penetration).
4. Make sure you have enough height in your tent
We mentioned earlier that you need to choose your reflector and tent together.
What we didn’t talk about is your tent’s height.
Your tent needs to be high enough to:
- Support your light intensity
- Eliminate heat problems
- Allow you to keep a safe distance between plants and lights
The height you need depends on the reflector. For instance, a 750W Adjust-A-Wings HELLION light can be fixed much lower than a 750W Gavita light. It depends on the reflect, but as a rule, you will need:
- 200cm (600W lights)
- 200cm (750W Adjust-A-Wings HELLION lights)
- 215cm (750W Gavita lights)
- 215 - 240cm (1000W Gavita lights)
Read more here on choosing your tent’s height.

5. Use a Supplemental Grow Light
Most grow lamps mostly emit wavelengths between 400nm – 700nm, known as the PAR range. These are the wavelengths plants use for growth.
While they’re not used for growth, wavelengths outside the PAR range play a key part in plant health.
Specifically, supplemental lights are known to emit lots of UVA & UVB, to help plants:
- Produce more anti-oxidants, essential oils, terpenes (smell) & flavonoids (taste)
- Have greater resistance to mould, pests and diseases
- Produce bigger and bushier with more lateral branches
There are two kinds of supplemental light - LEP (Light Emitting Plasma) and CDM (Ceramic Discharge Metal Halide).
If using supplemental grow lights, you need to make sure you get an even coverage across your area of this spectrum.
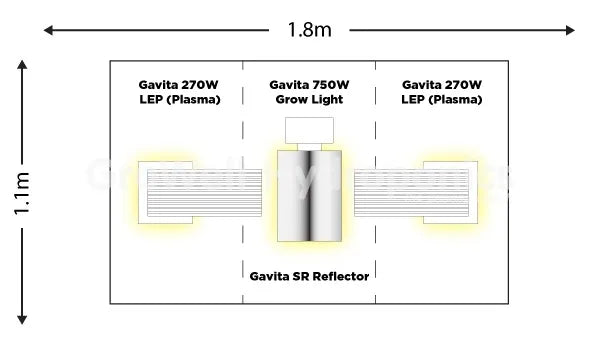
One way of ensuring even coverage is to:
- Position one supplemental light between 2 HID lights
- Position a supplemental light on either side of one HID light
Chances are, you’ll be using a different number of supplemental lights than you are HID lights. This means, you will need to use a different reflector that has a different coverage area.
You may even want to run your supplemental light at a different orientation to your main HID lights.
Get a Free Lighting Layout
Ask for your free customised layout when you buy Gavita lights!
You don’t have to think. Using Gavita’s 3D modelling software, we’ll tell you:
- Which grow tent is best
- Which lights are best
- The best reflectors to use
- How you should position your lights
- Maximum plant heights
It’s very scientific. Follow your plan, and you’ll get an intense uniform light that floods your entire growing area:
- Minimum light lost to walls
- A uniform light level
- Maximum light intensity
- Deeper light penetration (to reach foliage beneath the canopy layer)
- A broad spectrum of light (with lots of UV-A & UV-B)


