Grow Room Ventilation: How to Pick & Install Basic Extraction Equipment
Last Updated on 26/03/2021
Got an extraction system? This is the first thing you should fit in your grow room. It takes hot, humid, stale, CO2 depleted air away from your plants. Fresh, cooler, CO2 rich air can then enter (passively through vents or actively via an intake fan). As a result, temperature, humidity, pest populations, CO2 levels and overall air quality are all easier to control. Overall, plants are growing in a more productive environment. Here's how you set an extraction system up correctly.
Equipment
You need at least a basic extraction system. These come with:
- 1 x Extractor fan: which moves the air
- 1 x Carbon filter: removes odours out of the air before it gets extracted (stops smells escaping your tent)
- 1 x Length of ducting: carries and directs the air being moved
- Clips and/or clamps: Used to connect your fan, filter and ducting together
All of our extraction system kits are supplied with everything listed above.
You will also need:
- Hanging equipment: normally S-Hooks & Chain or Rope Ratchets
We recommend:
For tighter environmental control, get a fan speed controller. Basic ones let you choose how fast to run fans (at a set % speed – e.g 50% speed). More advanced ones speed fans up or slow them down according to your grow room temperature.
What Size Fan(s)?
Your extraction system should be viewed as part of your overall ventilation system. Together with an intake fan or vent, the complete setup needs to ensure that enough air is moved into and out of your grow room. This will take away excess heat produced by grow lights, and humidity released by plants, while also enriching CO2 levels.
The amount of air you need to move largely depends on:
- the size & shape of your tent
- the type, power & number of lights you have
Extraction
To calculate the size of extraction fan you need, do the following:
1. First of all, work out how big your ‘active growing area’ is. That's the space that's covered by your grow lights.
Multiply your active area's L x W x D to get the volume. If in doubt, use your tent's L x W x D.
| Example (BAY6 XL Tent) |
|---|
|
2. Work out the volume of air you need to exchange per hour by multiplying the total area by 60
| Example (BAY6 XL Tent) |
|---|
|
3. Next, you need to factor in carbon filters and ducting. They tend to reduce your flow rate.
The exact reduction varies (e.g the longer the ducting, the bigger the reduction). But for most, it'll be about 25%. To factor this in, multiply your first flow rate by 1.25.
If your ducting is very long or goes around multiple bends, add another 20% (multiply by 1.2)
| Example (BAY6 XL Tent) |
|---|
|
4. Think about things that might affect your grow room temperature and adjust your flow rate:
- Add 20% for a warm attic (multiply by 1.2)
- Minus 15% in a basement (muliply by 0.85)
- Minus 25 - 30% for air cooled lights (multiply by 0.75 - 0.7)
Don't forget that south facing rooms are also warmer than north facing ones.
| Example (BAY6 XL Tent) – if in a warm attic: |
|---|
|
Your final figure is the maximum amount of air you should extract every hour. If you extract more than this, you could remove too much heat and humidity.
Intake
You need to draw in 15 - 20% less air than you extract. This is to maintain negative pressure. Doing this stops your tent from overfilling with air. If your tent overfills with air, unfiltered air can start seeping out of tent joins and corners.
How To Assemble
RAM Mixed-Flow Fan & BAY6 Filter Kit
With this kit, you get:
- 1 x Extractor fan: which moves the air
- 1 x Carbon filter: removes odours out of the air before it gets extracted (stops smells escaping your tent)
- 1 x Length of ducting: carries and directs the air being moved
- 3 x Duct clips: connects ducting to your fan, then a length of ducting between your fan and filter

1. Plug your fan in to check that it works.

2.Line up the RAM Mixed-Flow Fan and BAY6 Carbon Filter on the floor. Ensure the arrow on the fan points in the opposite direction to the filter.

3. Cut a small piece of ducting to sit between the fan and filter.

 4. Connect the small piece of ducting to the spigot on the carbon filter, using a duct clip.


5. Connect the other end of the small piece of ducting to the intake end of the RAM Mixed-Flow Fan, using a duct clip. Make sure that the arrow on the fan continues to point in the opposite direction to the filter.


6. Connect the remaining length of ducting to the open exhaust end of the RAM Mixed-Flow Fan, using your last duct clip.
RVK Fan & CarboAir 50 Filter Kit
With this kit you get:
- 1 x Extractor fan: which moves the air
- 1 x Carbon filter: removes odours out of the air before it gets extracted (stops smells escaping your tent)
- 1 x Length of ducting: carries and directs the air being moved
- 1 x Duct clip: connects ducting to the exhaust end of your fan
- 1 x Fast clamp: really securely connects your fan and filter together

1. Plug your fan in to check that it works.

2. Line up the RVK Fan and CarboAir 50 Carbon Filter on the floor. Ensure the arrow on the fan points in the opposite direction to the filter.

3. Use a fast clamp to connect the intake end of the fan with the spigot on the filter.


4. Use a duct clip to connect one end of the length of ducting to the open exhaust end of the RVK Fan.
How to Suspend (using Chain & S-Hooks)

1. Loop 2 lengths of chain around the carbon filter and resize to create a cradle tor the carbon filter Make sure the filter can be positioned high up in your grow tent.

2. Move the support bars in your tent to where they are needed and put the chain for the carbon filter into position

3. Create a small loop of chain on the support bar for holding the fan.

4. Create a hanging point on the fan
with a small piece of chain.

5. Attach the bottom of an S-Hook to
the hanging point on the fan.

6. Move the extraction system into your tent and line it up underneath the hanging equipment.
7. Carefully lift the extraction system. Attach the top of the S-Hook that's connected to the fan onto the small loop of chain you created for it.

8. Carefully manoeuvre the carbon filter through the 2 loops of chain so that it is supported by the cradle.

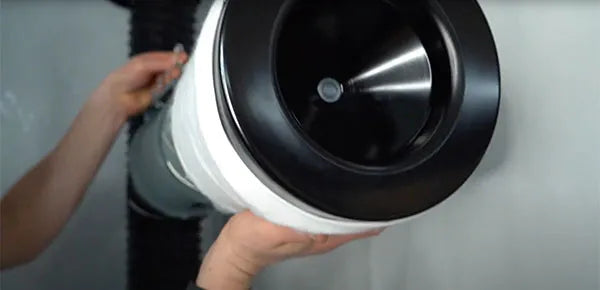
9. Push ducting though the port from the inside

10. Pull ducting from the outside until it is taut and flush with the system

11. Connect the power lead to your fan. Feed the other end through a small port and plug it into a mains socket or a controller

12. Tighten all of the drawstrings on all of the port socks
Top Tips
To get the best from your extraction and intake equipment, follow these top tips:

1. Vent Air Well Away From Your Tent
Ideally run the ducting from your extraction system through a drilled hole to your loft, or up into your chimney, or through a wall and straight outdoors. Failing that, take it to an open window or a separate room with an open window. You want to avoid just constantly recirculating the same air within the growing space - i.e. putting a tent in a room and just shutting the door on it.

2. Use Intake Air From Inside Your Home
For a stable temperature, draw air into your grow room from another indoor room, rather than from outside. This is because CO2 levels are higher in your home, and your humidity won't fluctuate as much. You'll also benefit come the winter, when the outside air is too cold for plants.

3. Prevent Pests
Depending on how it's set up, use a bug blocker on your intake fan or intake
ducting. Any measure that stops pests from accessing your plants is worth the
effort in our book.

4. Keep Ducting Short And Straight
The longer the length of ducting the greater the pressure drop, which ultimately
reduces airflow. Use metal bends if corners are required and consider a fast clamp to increase efficiency.

5. Run Fans 24/7
Operate your extraction and intake fans 24/7. With a fan speed controller, you
can speed up or slow down fans to maintain optimum conditions when lights
are on and off.

6. Keep Your Pre-Filter Clean
Keep an eye on your carbon filter sleeve (also known as the pre-filter) as this collects particles before they get sucked into the charcoal. We recommend putting these in the washing machine with no detergent whenever they start to look dirty.

7. Replace Carbon Filters When Needed
Under normal operating conditions, replace a BAY6 Carbon Filter every 9 months and a CarboAir 50 Carbon Filter every 18 months. However, if your filter has been exposed to prolonged periods of high humidity, this can shorten the life of the product, another reason for good environmental control.